Honeywell CT87K Thermostat Wiring Diagram
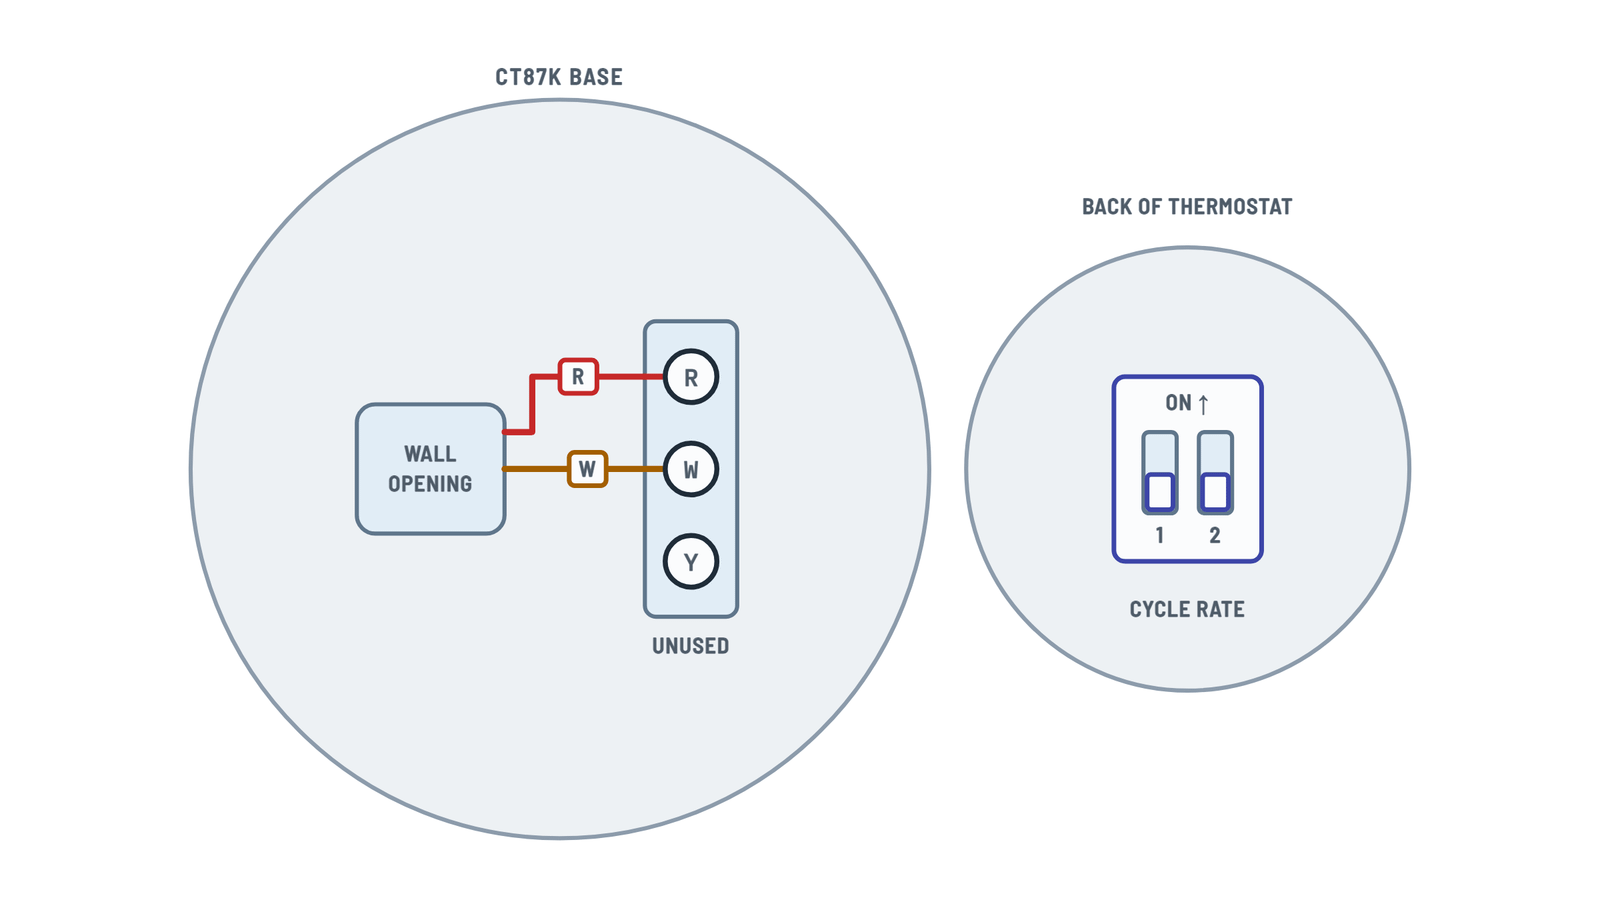
CT87K connections
Thermostat base with terminals R, W and Y, and the cycle rate switches on the back.
Terminals and components · 4
- R
- W
- Y
- Cycle rate
If the label doesn't match
Connect here the wire labeled R, RH, 4 or V.
Do not use
C, X or B wires are not connected: wrap the bare end with electrical tape.
Four or more wires?
If your old thermostat had 4 or more wires (not counting C or C1), this may be the wrong replacement thermostat.
If the label doesn't match
Connect here the wire labeled W, W1 or H.
2-wire system
On a 2-wire heat-only system, connect one wire to R and the other to W; Y stays unused.
3-wire system
On a 3-wire hot water heat-only system, connect R to R, W to W and Y to Y.
If the label doesn't match
Connect here the wire labeled Y, Y1 or M.
By heating system
1 2 System ON ON Steam or gravity OFF ON High efficiency warm air (90% plus), hot water or heat pump OFF OFF Gas or oil warm air (factory setting) ON OFF Electric warm air
About This Diagram
This diagram is redrawn from page 2 of the Honeywell CT87K Thermostat manual, and we offer it completely free and in English. We have also categorized it in the Thermostats (HVAC & Water Heating) section on Diagramverse, and it has been rated by 1 user with an average rating of 5.0. If you have any specific questions about the Honeywell CT87K Thermostat Wiring Diagram, we suggest checking the Frequently Asked Questions (FAQs) section.
Printable Honeywell CT87K Wiring Diagrams


Wiring Instructions
Before you start
The Honeywell CT87K is a heat-only thermostat for 24 Vac heating systems. It uses either two wires (R and W) or, on some hot water systems, three wires (R, W and Y). Pick the variant in the diagram that matches the number of wires at your old thermostat. Don't count wires that were on terminals C or C1. If you find 4 or more wires, the CT87K is probably the wrong replacement. If your system also has cooling, look at the CT87N instead.
Tools you need:
- No. 2 Phillips screwdriver and a small pocket screwdriver
- Drill with a 3/16 in bit for drywall or a 7/32 in bit for plaster
- Hammer, pencil, and a level if you want one
- The wire labels, wall anchors and screws that come in the package
The sources don't specify a wire gauge. In practice you reuse the existing thermostat cable, which is normally a solid-copper low-voltage cable. Don't swap it for a thinner wire.
Turn off power to the heating system at the furnace or boiler switch, or at the fuse or circuit breaker panel. Replacing a low-voltage thermostat is usually a homeowner job. Call a licensed HVAC technician if any of these apply:
- The wires at the old thermostat are thick household cable, or are marked 120 V or 240 V
- The old thermostat was a line-voltage model
- You're unsure what type of heating system you have
Step-by-step wiring
- Remove the cover of the old thermostat, then the thermostat itself. Leave the wallplate on the wall with the wires still attached.
- Check the old unit for a sealed glass tube of mercury. If there is one, don't put it in the trash: ask your local waste management authority how to dispose of it.
- Disconnect the wires one at a time. As you remove each one, wrap it with the supplied label that matches the letter on the old terminal. Ignore wire colors: only the terminal letters count.
- Once every wire is labeled, remove the old wallplate. Don't let the wires fall back into the wall opening.
- Pull the wires through the CT87K base and hold the base against the wall. Level it if you like, and mark both screw holes with a pencil.
- Drill the holes and tap in the anchors until they sit flush with the wall. You can pull the wires through the optional cover plate first if you need to hide marks left by the old thermostat.
- Pull the wires through the base, line it up over the anchors and drive in the mounting screws.
- Connect R: the wire labeled R, RH, 4 or V goes to terminal R. Loosen the screw, put the bare wire into the slot and tighten the screw firmly.
- Connect W: the wire labeled W, W1 or H goes to terminal W.
- Only for a 3-wire hot water system, connect Y: the wire labeled Y, Y1 or M goes to terminal Y. On a 2-wire system, leave Y empty.
- If you have a wire labeled C, X or B, don't connect it. Wrap its bare end with electrical tape and push it back into the wall.
- Push any extra wire back into the wall so it can't get pinched behind the thermostat.
- On the back of the thermostat, set the cycle rate switches to match your system:
- Gas or oil warm air: Switch 1 OFF, Switch 2 OFF (factory setting)
- High efficiency warm air (90% plus), hot water, or heat pump: Switch 1 OFF, Switch 2 ON
- Steam or gravity: Switch 1 ON, Switch 2 ON
- Electric warm air: Switch 1 ON, Switch 2 OFF
- Line up the slots on the base with the tabs on the thermostat and push gently until the thermostat snaps into place.
Testing and start-up
Turn the power back on at the heating system or the breaker panel. Then test the thermostat:
- Turn the dial a few degrees above the room temperature shown on the thermostat. Within a short time, the burner, boiler or circulator should start.
- Turn the dial a few degrees below room temperature. The heat should stop. On warm air systems the blower may keep running briefly to clear heat from the furnace, which is normal.
- Leave it running for a full day. If the room temperature swings too much or the system turns on and off too often, check the cycle rate switch setting against your heating type.
If the heat doesn't respond, you can measure it as an experienced user, using general good practice. With the thermostat off its base and power on, set a multimeter to AC volts and measure across R and W. You should normally read about 24 V AC. Reading 0 V means the heating system isn't supplying control power.
Safety notes
- The CT87K is for low-voltage 24 Vac control circuits only. Never connect it to 120 V or 240 V wiring. That destroys the thermostat and can cause shock or fire.
- Always turn off power before you touch the wires. A short between R and another wire can blow the fuse in the heating system or damage its control transformer.
- Keep bare wire ends short so they can't touch neighboring terminals.
- The thermostat has a lithium battery that may contain perchlorate. Special handling may apply when you dispose of it.
- Recycle any old mercury thermostat properly. Never break the tube.
Troubleshooting
| Symptom | Probable Cause | What to Check |
|---|---|---|
| The heat never comes on, even with the dial turned all the way up | No power from the heating system, a loose R or W connection, or a blown fuse in the system | Make sure the furnace or boiler switch and the breaker are on. With the thermostat off its base and power on, measure across R and W. You should normally read about 24 V AC. If you read 0 V, check the system's control fuse and transformer. |
| The heat runs nonstop and won't shut off | R and W wires touching, or a shorted cable in the wall | Turn off power and check that no bare copper bridges R and W at the base. Take the thermostat off: if the heat still runs with R and W disconnected and separated, the problem is in the cable or the heating control, not the thermostat. |
| The system stopped working right after I connected all my old wires | A C, X or B wire was connected, or a wire went to the wrong terminal because of its color | Only R, W and, on 3-wire hot water systems, Y should be connected. Tape off C, X or B wires. Check every wire against its letter label, not its color. |
| My hot water system doesn't respond properly | 3-wire system wired as 2-wire, with the Y wire left unconnected | If the old thermostat had a third wire labeled Y, Y1 or M, connect it to terminal Y. Use the 3-wire variant of the diagram. |
| I have four or more wires and don't know where they go | The system has cooling or other functions the CT87K can't control | Count the wires again, leaving out C and C1. If there are still 4 or more, the CT87K is the wrong model. Look at a heating and cooling thermostat such as the CT87N, or ask a technician. |
| The room temperature swings a lot between cycles | Cycle rate switches set for the wrong type of heating system | Take the thermostat off its base and check switches 1 and 2. Steam or gravity: both ON. Hot water or high efficiency: 1 OFF, 2 ON. Gas or oil warm air: both OFF. Electric warm air: 1 ON, 2 OFF. |
| The heat turns on and off too often | Cycle rate set for a faster system than yours, for example electric settings on a boiler | Set the cycle rate switches to match your actual heating system, then watch it for a day. |
| The thermostat works sometimes, then stops | Loose screw terminal or a nicked wire | Turn off power. Strip the wire back to clean, undamaged copper, put it fully into the slot and tighten the screw. Tug gently to confirm it holds. |
| The thermostat got hot, smelled burnt or stopped working right away | Connected to line-voltage wiring instead of a 24 Vac control circuit | Turn off the breaker. If the old wires are heavy household cable or the old thermostat was rated 120 V or 240 V, the CT87K isn't suitable. Have a licensed technician check the system. |