MSD 6AL 6420 Ignition Control Wiring Diagram
Basic installation
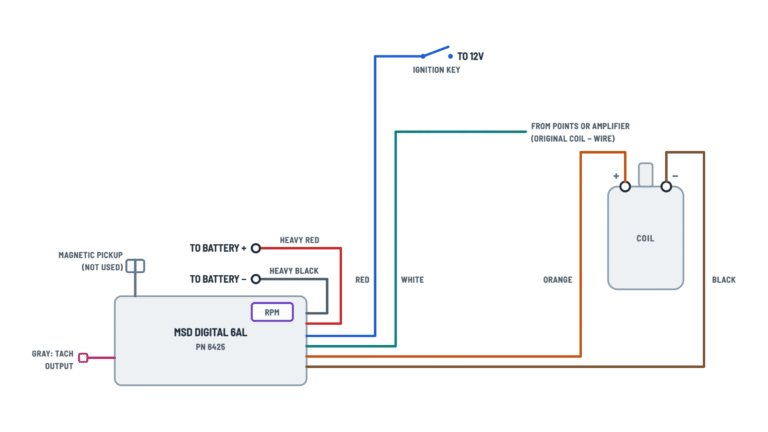
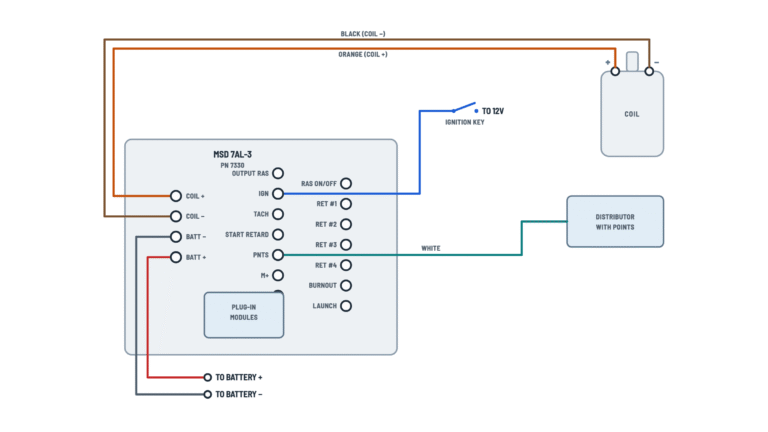
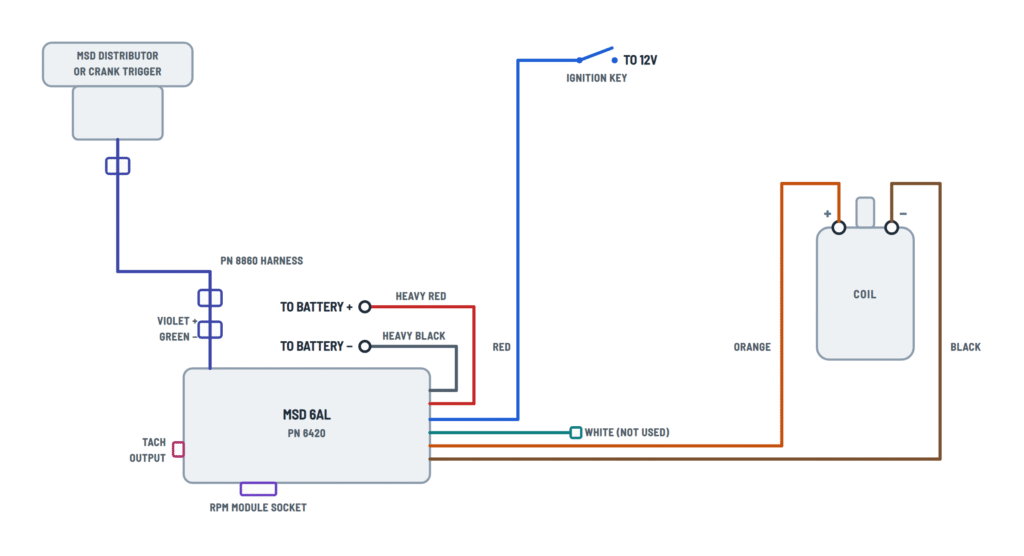
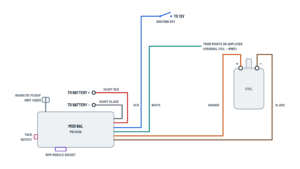
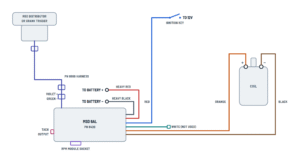
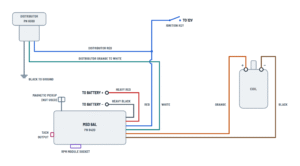
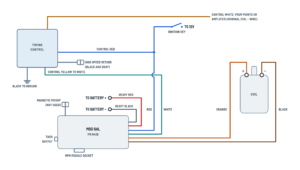
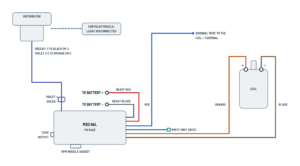
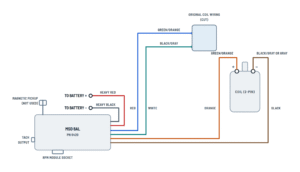
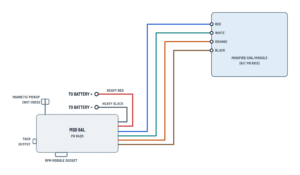
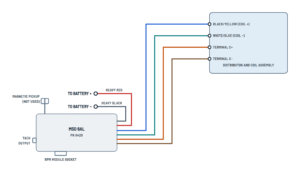
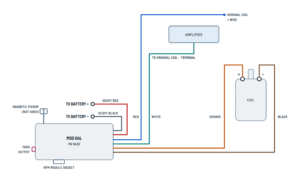
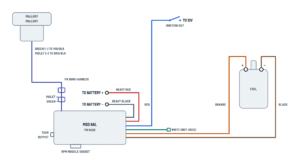
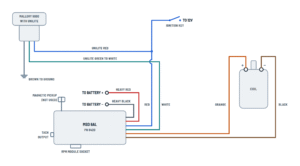
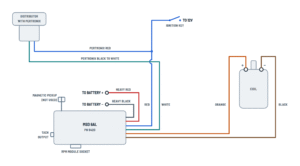
6AL wiring with points or amplifier trigger, or with an MSD distributor.
Terminals and components · 9
- Battery +
- Ground
- Switched 12 V
- Trigger (white)
- Magnetic pickup
- Coil +
- Coil −
Caution
Never connect it to the alternator. The ignition has an internal fuse: no other fuse is needed.
Good ground
Connect it to clean, paint-free metal and make sure there is a ground strap between the engine and the chassis.
Ballast resistor
It is not needed: if there is one in the coil wiring, bypass it.
Voltage
It must not drop below 10 V while cranking or the ignition will not fire.
Voltage
It must not drop below 10 V while cranking or the ignition will not fire.
Dual points
With dual points, remove the trailing set of points.
One trigger only
Use either the white wire or the magnetic connector, never both.
Not used
With magnetic trigger the white wire is not connected: tape it off.
One trigger only
Use either the white wire or the magnetic connector, never both.
Connection
The connector plugs straight into the MSD distributor or crank trigger with the PN 8860 harness.
Routing
Keep these wires twisted together and away from the other wires and the plug wires.
Danger
This is a capacitive discharge ignition: there is high voltage at the coil terminals. Do not touch them or connect test equipment while cranking or running.
Original wires
Remove the original coil wires: the + wire goes to the MSD red and the − wire to the white (if used).
Tachometers
If the tach does not work from this terminal, it needs an MSD adapter: PN 8920 with magnetic trigger or PN 8910 with white wire trigger (voltage triggered tachs).
Cylinder select
It comes set for 8 cylinders. On 4 or 6-cylinder even-fire engines, cut the red or blue loop of the side selector as shown in the manual's chart.
Original wire
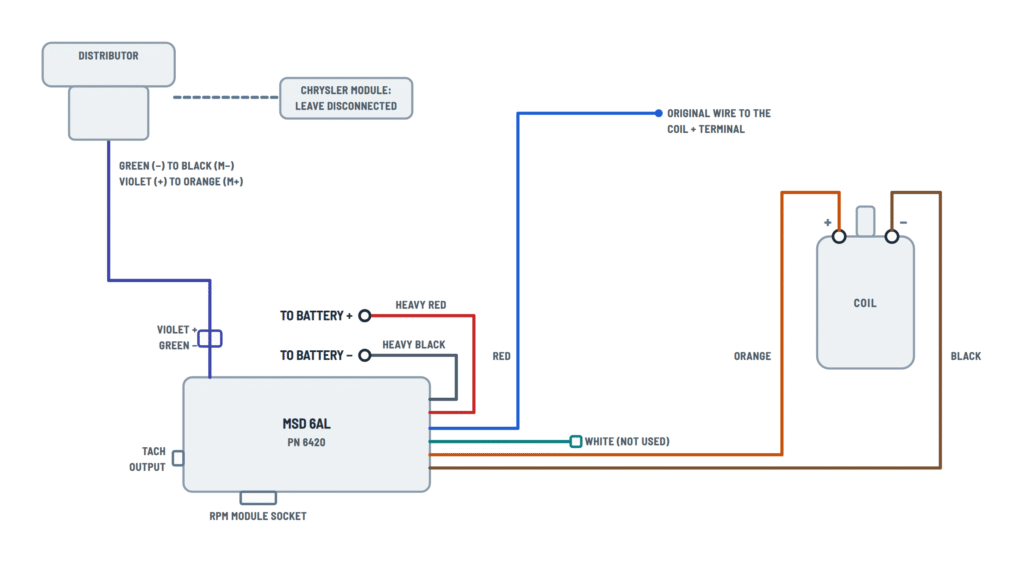
The wire that fed the original coil + is usually used.
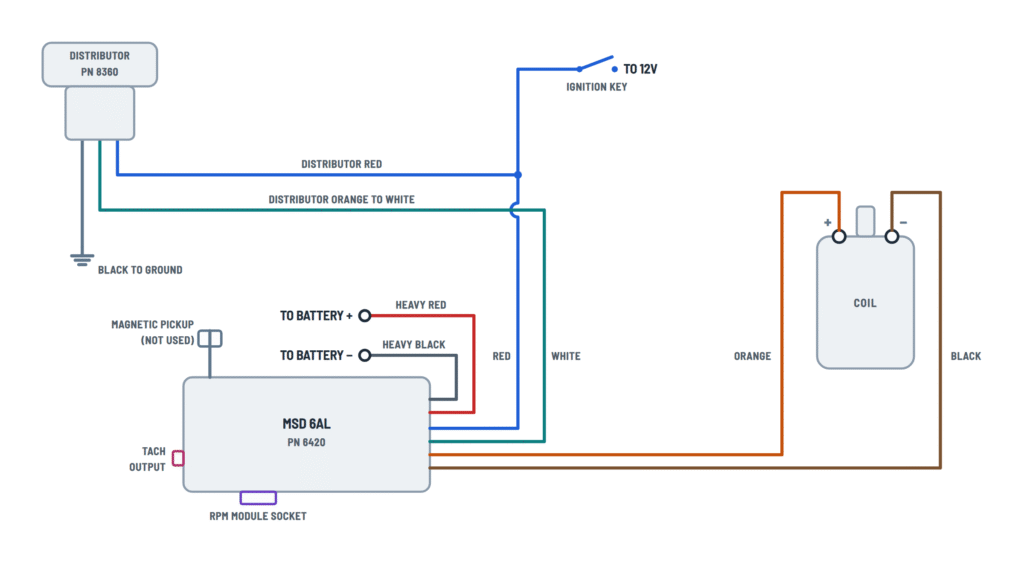
Distributor wires
Wire Goes to Red Switched 12 V, with the MSD red Orange MSD white (trigger) Black Ground Trigger
The 8360 distributor's ignition module still triggers the MSD.
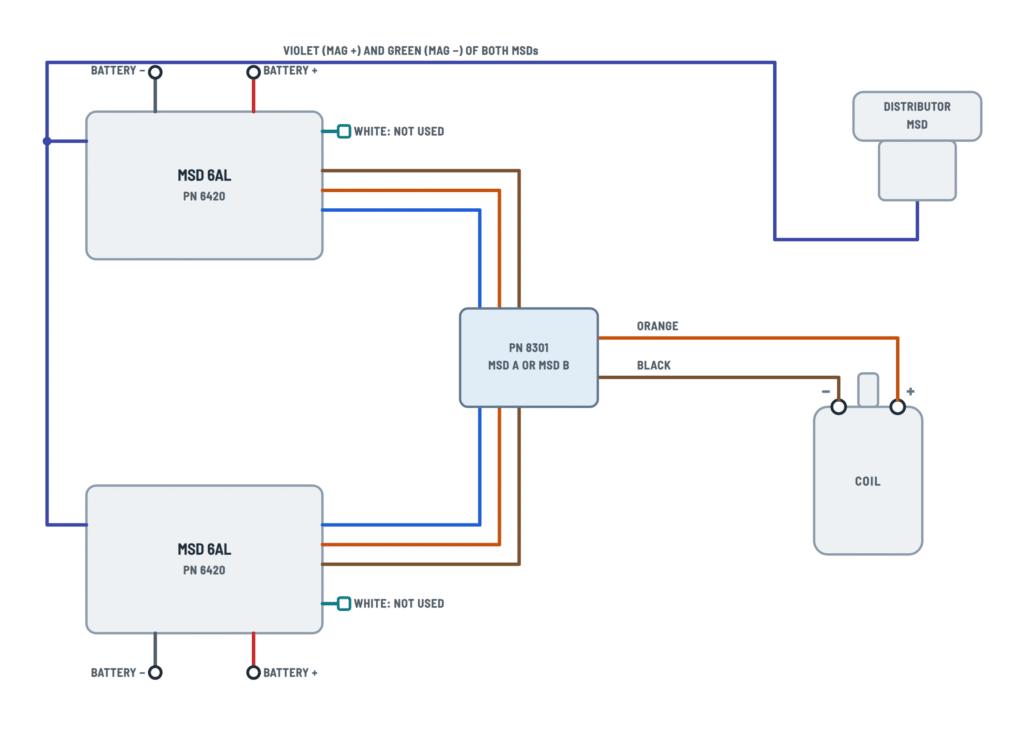
With MSD controls and dual systems
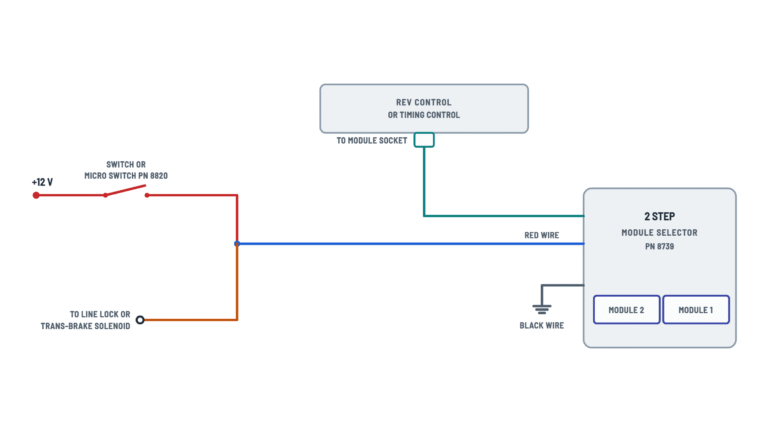
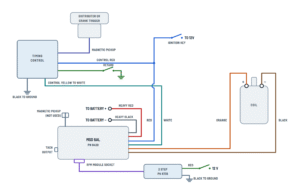
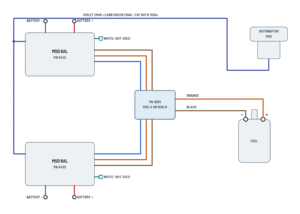
Timing control, drag race setup with a 2 Step and two ignitions on the same engine.
Terminals and components · 8
- Battery +
- Ground
- Switched 12 V
- Trigger (white)
- Magnetic pickup
- Coil +
- Coil −
Caution
Never connect it to the alternator. The ignition has an internal fuse: no other fuse is needed.
Good ground
Connect it to clean, paint-free metal and make sure there is a ground strap between the engine and the chassis.
Voltage
It must not drop below 10 V while cranking or the ignition will not fire.
One trigger only
Use either the white wire or the magnetic connector, never both.
Routing
Keep these wires twisted together and away from the other wires and the plug wires.
Danger
This is a capacitive discharge ignition: there is high voltage at the coil terminals. Do not touch them or connect test equipment while cranking or running.
Original wires
Remove the original coil wires: the + wire goes to the MSD red and the − wire to the white (if used).
2 Step selector
The PN 8739 2 Step selector plugs into the module socket and switches between two rpm modules; its black goes to ground.
Control wires
Wire Goes to White Points or amplifier (original coil − wire) Yellow MSD white Red Switched 12 V, with the MSD red Black Ground Black and gray High speed retard control Knob
Controls PN 8680, 8762 and 8962 also have a plug-in adjustment knob.
Control wires
Wire Goes to Pickup Distributor or crank trigger magnetic pickup Yellow MSD white Red Switched 12 V, with the MSD red Black Ground Gray Retard switch to ground Original wire
The wire that fed the original coil + is usually used.
Automatic selector
Both coil towers go to the automatic coil selector mounted on the distributor.
Retard switch
With the gray wire grounded there is no retard; opening the switch applies the retard.
2 Step switch
Sends 12 V to the 2 Step selector red to switch to module 1 (for example, the launch limit).
PN 8301 switch
Takes the orange, red and black wires of both MSDs and sends the selected ignition's wires to the coil.
SPDT switch PN 8807
Sends switched 12 V to the red wire of one MSD or the other: only the selected ignition works.
GM ignitions
GM single or dual connector coils, MSD harnesses and HEI distributors.
Terminals and components · 7
- Battery +
- Ground
- Switched 12 V
- Trigger (white)
- Magnetic pickup
- Coil +
- Coil −
Caution
Never connect it to the alternator. The ignition has an internal fuse: no other fuse is needed.
Good ground
Connect it to clean, paint-free metal and make sure there is a ground strap between the engine and the chassis.
Voltage
It must not drop below 10 V while cranking or the ignition will not fire.
One trigger only
Use either the white wire or the magnetic connector, never both.
Routing
Keep these wires twisted together and away from the other wires and the plug wires.
Danger
This is a capacitive discharge ignition: there is high voltage at the coil terminals. Do not touch them or connect test equipment while cranking or running.
Original wires
Remove the original coil wires: the + wire goes to the MSD red and the − wire to the white (if used).
Splices
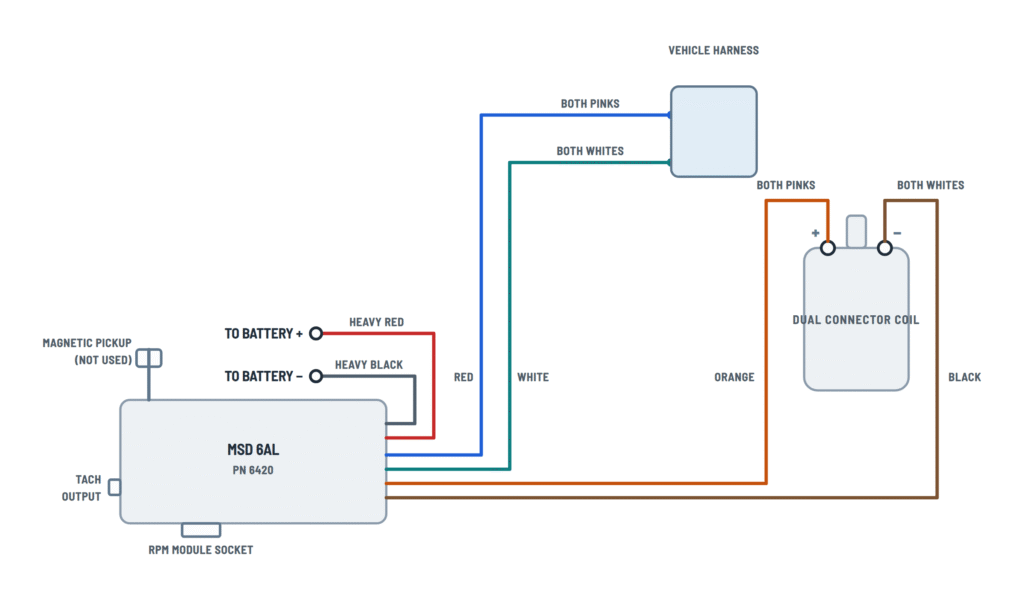
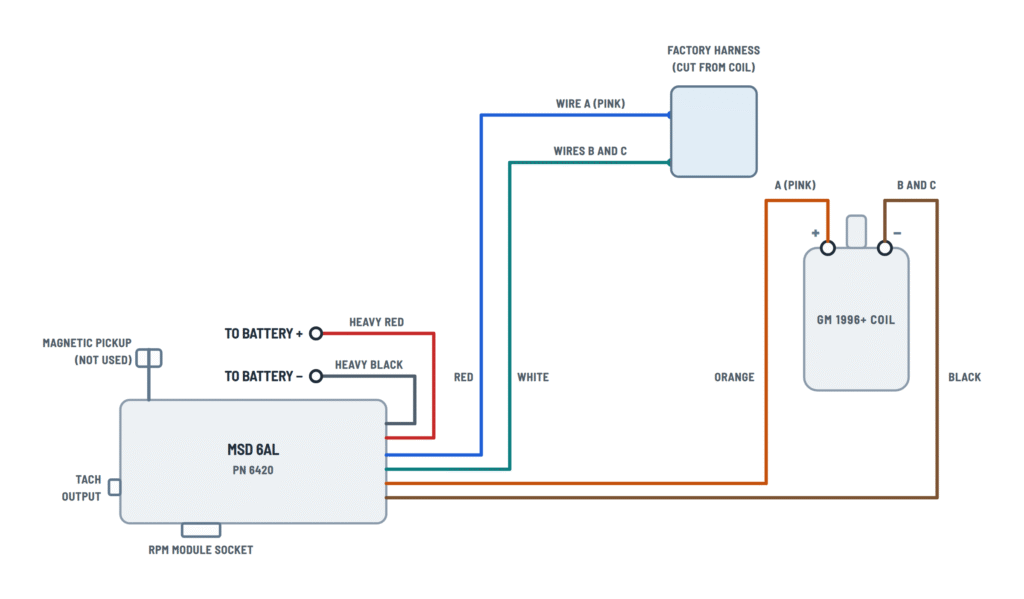
Cut and splice the two pink wires (coil +) and the two white wires (coil −). If the vehicle has no factory tach, there is only one white wire.
Plug-in harness
MSD offers a direct plug-in harness for this coil, PN 8876.
A-B-C connector
The coil connector is marked A-B-C: wire A (pink) is positive; the B and C wires are coil negative and their color varies by vehicle.
Plug-in harness
MSD offers a splice-free harness for 1996-on GM vehicles, PN 8877.
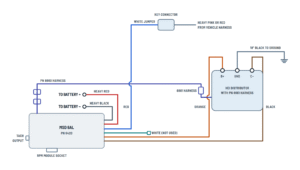
Key connector
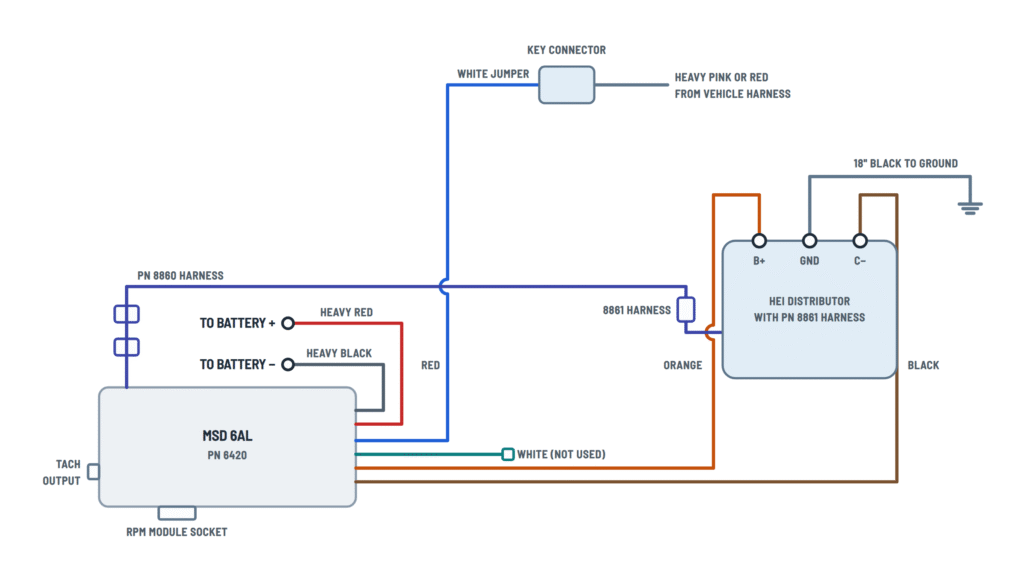
The white jumper joins the MSD red to the key connector, which carries the vehicle's heavy pink or red wire.
Distributor connector
White connects to brown (and the tach) and red to the 12 V pink, using the jumpers supplied with the MSD.
5-pin modules
Some may hesitate or stall on deceleration; MSD offers a diode to correct it.
Plug-in harness
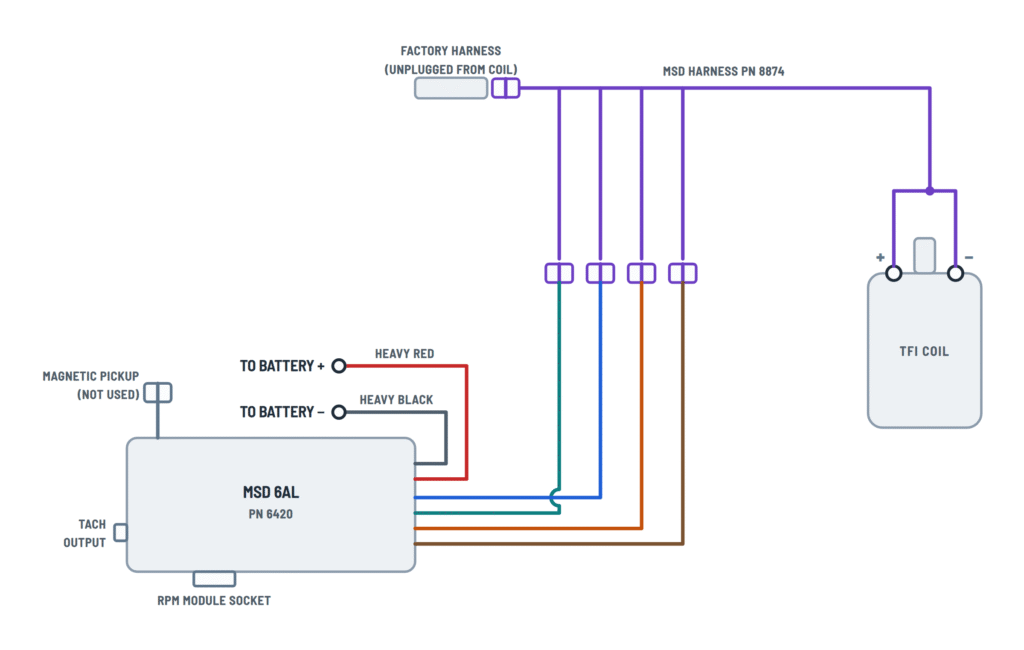
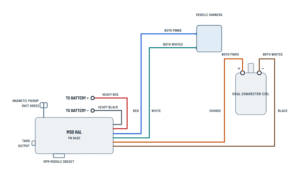
It plugs in between the factory harness and the coil: no cutting or splicing. Its red, white, orange and black leads plug into the MSD wires.
Part numbers
- PN 8876: dual connector coil.
- PN 8877: 1996-on GM vehicles.
Plug-in harness
PN 8876 (dual connector coil) or PN 8877 (1996-on GM) harness between the factory harness and the coil.
Control wires
Wire Goes to White MSD harness white lead Yellow MSD white Red Harness red lead, with the MSD red Black Ground 4-pin module
The GM ignition module is removed and replaced with the MSD PN 8861 harness, which connects the distributor pickup.
Connections
MSD wire Goes to Orange B+ Black C− Pickup 8860 harness → 8861 harness Ground
The 8861 harness wire goes to engine ground.
Connections
MSD wire Goes to Orange B+ Black C− Ground
The 18" black wire goes from the distributor to engine ground.
Ford ignitions
DuraSpark with white wire or magnetic trigger, and TFI coils with or without a harness.
Terminals and components · 7
- Battery +
- Ground
- Switched 12 V
- Trigger (white)
- Magnetic pickup
- Coil +
- Coil −
Caution
Never connect it to the alternator. The ignition has an internal fuse: no other fuse is needed.
Good ground
Connect it to clean, paint-free metal and make sure there is a ground strap between the engine and the chassis.
Voltage
It must not drop below 10 V while cranking or the ignition will not fire.
One trigger only
Use either the white wire or the magnetic connector, never both.
Routing
Keep these wires twisted together and away from the other wires and the plug wires.
Danger
This is a capacitive discharge ignition: there is high voltage at the coil terminals. Do not touch them or connect test equipment while cranking or running.
Original wires
Remove the original coil wires: the + wire goes to the MSD red and the − wire to the white (if used).
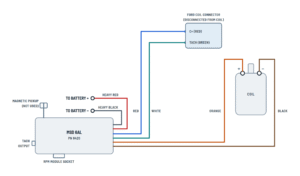
Coil connector
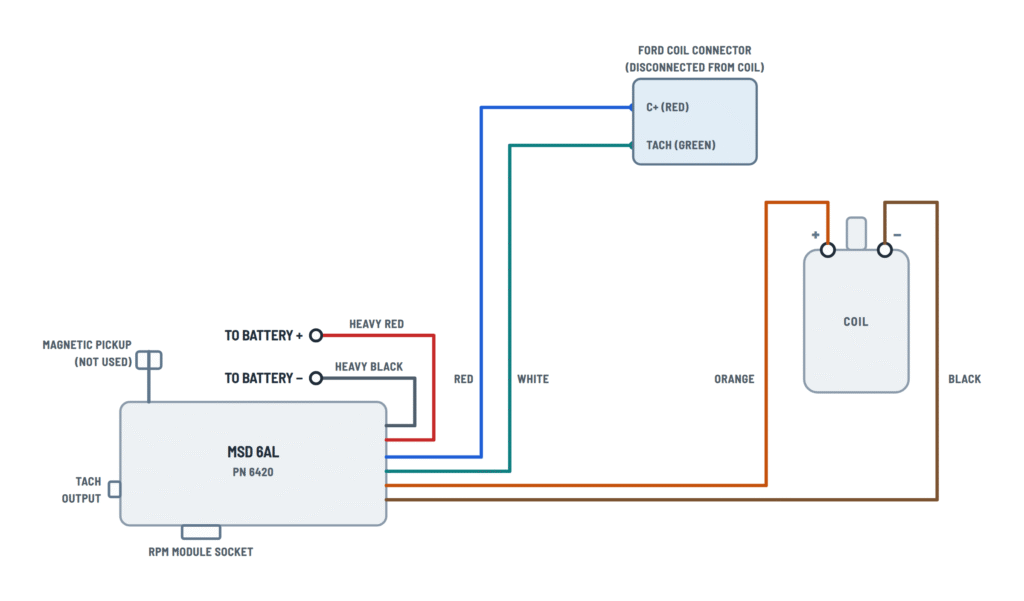
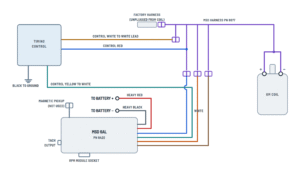
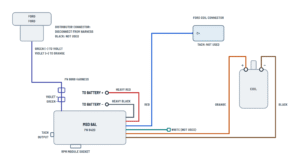
Disconnect the original coil connector: its C+ terminal (red) goes to the MSD red and its TACH terminal (green) to the white.
Coil connector
The MSD red goes to the C+ terminal of the original coil connector; the TACH terminal is not used.
TFI connector
Disconnect the coil connector and plug in the red and white jumpers supplied with the MSD: red to the red & light green wire, white to the dark green & yellow wire. Seal the open end.
Ford pickup
MSD Ford distributor Green (−) Violet Violet (+) Orange — Black: not used Harness
MSD offers the PN 8869 harness to connect the magnetic connector to the DuraSpark connector.
Plug-in harness
It plugs in between the factory Ford harness and the coil, with no cutting. Its red, white, orange and black leads plug into the MSD wires.
With a timing control
It connects as with the GM harness: the white lead goes to the control's white and the control's yellow to the MSD white.
Chrysler ignitions
Chrysler electronic ignition, Dodge with a 2-pin connector and Jeep with integrated coil and module.
Terminals and components · 8
- Battery +
- Ground
- Switched 12 V
- Trigger (white)
- Magnetic pickup
- Coil +
- Coil −
Caution
Never connect it to the alternator. The ignition has an internal fuse: no other fuse is needed.
Good ground
Connect it to clean, paint-free metal and make sure there is a ground strap between the engine and the chassis.
Voltage
It must not drop below 10 V while cranking or the ignition will not fire.
One trigger only
Use either the white wire or the magnetic connector, never both.
Routing
Keep these wires twisted together and away from the other wires and the plug wires.
Danger
This is a capacitive discharge ignition: there is high voltage at the coil terminals. Do not touch them or connect test equipment while cranking or running.
Original wires
Remove the original coil wires: the + wire goes to the MSD red and the − wire to the white (if used).
Chrysler pickup
MSD Distributor Green (−) Black (M−) Violet (+) Orange (M+) Original module
The Chrysler ignition module is left disconnected.
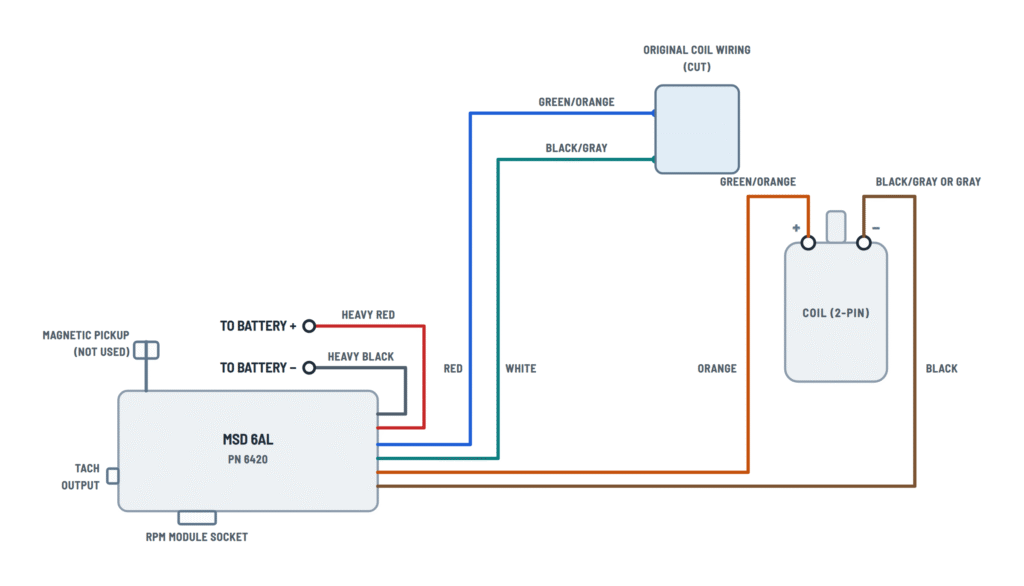
Original wiring
Original wire Goes to Green/orange (from the key) MSD red Black/gray (from the amplifier) MSD white Green/orange on the coil side MSD orange Black/gray or gray on the coil side MSD black Caution
The original coil wiring is cut.
PN 8813 kit
The MSD PN 8813 kit modifies the original Jeep coil/module assembly (many 1987–1989 models). The drawing shows the coil already modified.
Caution
The original harnesses must still be connected.
Imports
Honda with internal or external coil, and general import wiring.
Terminals and components · 7
- Battery +
- Ground
- Switched 12 V
- Trigger (white)
- Coil +
- Coil −
Caution
Never connect it to the alternator. The ignition has an internal fuse: no other fuse is needed.
Good ground
Connect it to clean, paint-free metal and make sure there is a ground strap between the engine and the chassis.
Voltage
It must not drop below 10 V while cranking or the ignition will not fire.
One trigger only
Use either the white wire or the magnetic connector, never both.
Danger
This is a capacitive discharge ignition: there is high voltage at the coil terminals. Do not touch them or connect test equipment while cranking or running.
Original wires
Remove the original coil wires: the + wire goes to the MSD red and the − wire to the white (if used).
Fuel injected imports
Some will not run or lose the tach with the MSD: they need the PN 8910 adapter (Toyota and Ford Probe, the PN 8910-EIS).
Tachometers
If the tach does not work from this terminal, it needs an MSD adapter: PN 8920 with magnetic trigger or PN 8910 with white wire trigger (voltage triggered tachs).
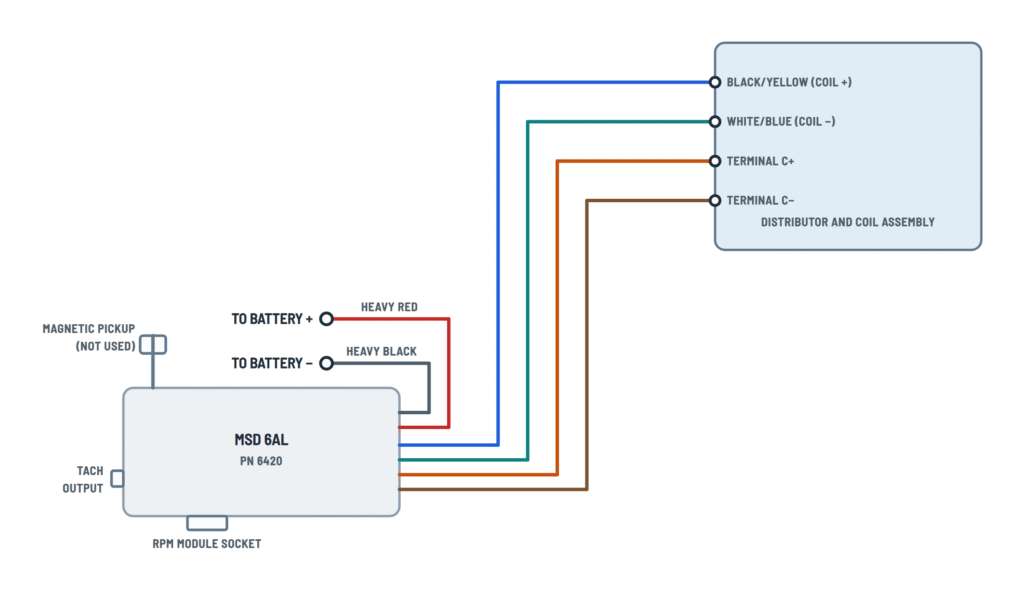
Connections
MSD wire Goes to Red Black/yellow wire (coil +) White White/blue wire (coil −) Orange Coil terminal C+ Black Coil terminal C− Power Cap
MSD offers a Power Cap to convert internal coil Hondas to an external coil on most popular models.
Connections
MSD wire Goes to Red Black/yellow: 12 V (original coil + wire) White White/blue: trigger (original coil − wire) Original wires
Original wire Goes to Yellow & black/yellow (original +, harness side) MSD red Green or blue (original −, harness side) MSD white Yellow & black/yellow (coil side) MSD orange Green or blue (coil side) MSD black Amplifier
Remove the coil wires: the negative (from the amplifier) goes to the MSD white and the positive to the red.
Aftermarket components
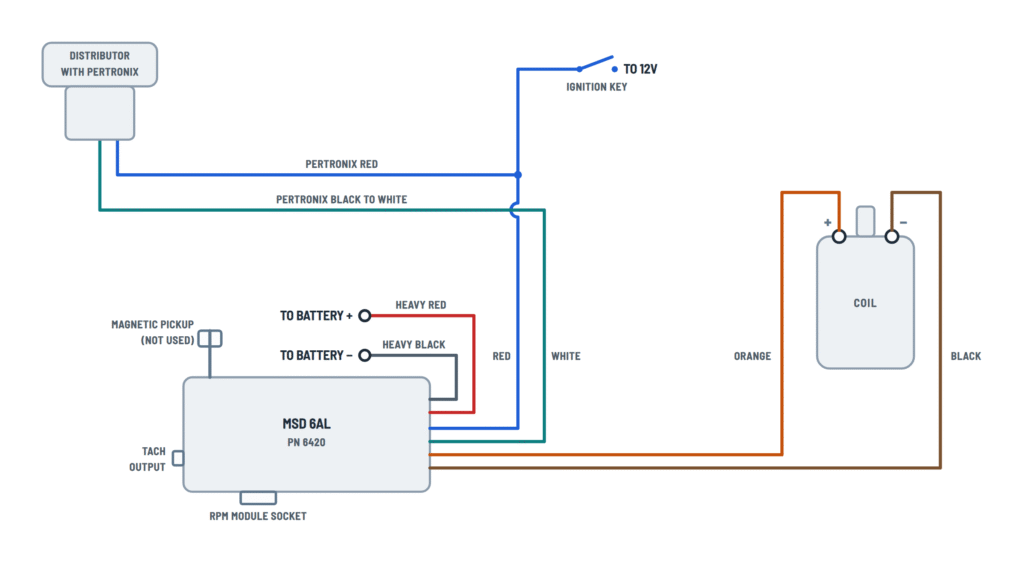
Mallory distributors (magnetic or Unilite) and Pertronix ignitor.
Terminals and components · 9
- Battery +
- Ground
- Switched 12 V
- Trigger (white)
- Magnetic pickup
- Coil +
- Coil −
Caution
Never connect it to the alternator. The ignition has an internal fuse: no other fuse is needed.
Good ground
Connect it to clean, paint-free metal and make sure there is a ground strap between the engine and the chassis.
Voltage
It must not drop below 10 V while cranking or the ignition will not fire.
One trigger only
Use either the white wire or the magnetic connector, never both.
Routing
Keep these wires twisted together and away from the other wires and the plug wires.
Danger
This is a capacitive discharge ignition: there is high voltage at the coil terminals. Do not touch them or connect test equipment while cranking or running.
Original wires
Remove the original coil wires: the + wire goes to the MSD red and the − wire to the white (if used).
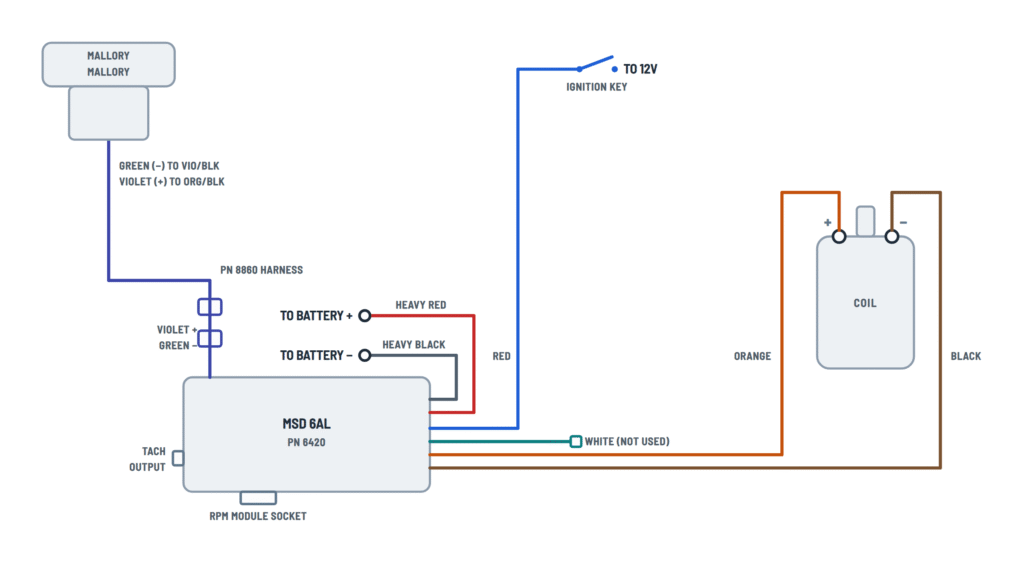
Mallory pickup
MSD Mallory Green (−) Violet/black Violet (+) Orange/black Unilite wires
Wire Goes to Red Switched 12 V, with the MSD red Green MSD white Brown Ground Pertronix wires
Wire Goes to Red Switched 12 V, with the MSD red Black MSD white Original wire
The wire that fed the original coil + is usually used.
About This Diagram
These diagrams are redrawn from pages 10–24 of the MSD 6AL 6420 Ignition Control manual, and we offer them completely free and in English. We have also categorized it in the Ignition (Automotive) section on Diagramverse, and it has been rated by 1 user with an average rating of 5.0. If you have any specific questions about the MSD 6AL 6420 Ignition Control Wiring Diagram, we suggest checking the Frequently Asked Questions (FAQs) section.
Printable MSD 6AL 6420 Wiring Diagrams





















Wiring Instructions
Before you start
First, pick the MSD 6AL 6420 diagram that matches how your engine triggers the ignition. If your coil negative was driven by points, a factory amplifier or another module, use a White wire variant. If you are plugging into a magnetic pickup in an MSD distributor, crank trigger, factory distributor or aftermarket distributor, use a Magnetic pickup connector variant. On a GM large cap HEI, remove the cap and rotor and count the terminals on the ignition module. A 4-pin module uses the magnetic variant. A 5 or 7-pin module uses the white wire variant. A Ford DuraSpark can be wired either way. A TFI or a late GM coil can be wired by splicing or with an MSD plug-in harness.
The 6AL works on any negative ground 12 V system that has a distributor. It cannot be used on distributorless (DIS) engines or on vehicles that came with a CD ignition from the factory. You will need a drill with a 3/16" bit for the vibration mounts, a quality crimper, solder, heat shrink and a digital multimeter. Keep the factory wire gauges. If you must lengthen a wire, go one size bigger: 10 gauge for the heavy power leads and 16 gauge for everything else. Solder and seal every splice. You do not need a fuse because the unit has an internal fuse. If you can't confidently identify the factory coil and trigger wires on your vehicle, have an automotive electrician do the job.
Step-by-step wiring
- Disconnect the battery, negative cable first.
- If the engine is a 4 or 6-cylinder even-fire, set the cylinder select before you mount the box. Remove the round black cover on the side, cut the Red or Blue loop shown on the cylinder chart supplied with the unit, bend the cut ends apart and refit the cover.
- Mount the unit away from exhaust heat and sharp edges, and never upside down. Install the vibration mounts first. Before you drill, check that every wire reaches its connection.
- Run the Heavy red straight to the battery + terminal, a positive junction or the + side of the starter solenoid. Never connect it to the alternator. Run the Heavy black to the battery − terminal or to clean, paint-free metal on the engine. Make sure there is a ground strap between the engine and the chassis.
- Remove every original wire from both coil terminals and bypass any ballast resistor. In white wire installations, the original coil + wire usually goes to the MSD Red and the original coil − wire goes to the MSD White. If the car has dual points, remove the trailing set.
- Connect the Orange to coil + and the Black to coil −. Nothing else may touch either coil terminal.
- Connect only one trigger circuit. If you use the White, leave the magnetic pickup connector unplugged. If you use the Violet · Green connector, Violet is + and Green is −, and you tape and cover the unused White. Twist the pickup wires together and route them separately, preferably along the block or firewall.
- If the Red is not already connected, connect it to a source that has 12 V only with the key on.
- Plug in the RPM module for your rev limit. Modules come in 100 rpm steps, and 3,000, 6,000, 7,000 and 8,000 rpm modules are included.
- If you use a tachometer or shift light, connect it to the Tach output terminal with the supplied Faston receptacle.
- If you add an MSD timing control, connect its yellow wire to the MSD White, as shown on the MSD controls tab. On a dual setup, wire each unit exactly as its variant shows.
- Reconnect the battery, positive first and negative last.
Testing and start-up
Before you crank the engine, check these points:
- Orange and Black are the only wires on the coil.
- Both power leads run directly to the battery or to a valid positive point and ground.
- The cylinder select is set.
- The battery is fully charged.
With the key on, the Red should read about 12 V to ground. During cranking it must stay above 10 V or the unit will not fire. You will read no voltage at coil + with the key on. This is normal for a CD ignition, so don't take it as a fault.
For a spark test, turn the key off, remove the coil wire from the cap and hold its end about 1/2" from ground. For a white wire trigger, disconnect the White from the points or amplifier, turn the key on without cranking, and tap the White to ground several times. A spark should jump each time you pull it away. For a magnetic trigger, unplug the pickup and briefly short Violet to Green with a jumper instead. A spark should jump each time you break the short. Once you have a good spark, reconnect the trigger and start the engine.
The unit may sometimes fire one spark when you turn the key on or connect the battery. This is normal.
Safety notes
- The capacitor charges to about 460 to 480 volts. The coil primary carries that high voltage whenever the engine is cranking or running. Never touch the coil terminals and never connect test equipment to them.
- Use only helically wound spark plug wires. Solid core wires create interference that disrupts the unit.
- Before welding on the vehicle, disconnect both heavy power leads and the tach ground wire.
- Do not seal or pot the box. It is already coated and needs to drain any moisture that gets in.
Troubleshooting
| Symptom | Probable Cause | What to Check |
|---|---|---|
| Engine cranks but never starts after the install | Red wire not getting switched 12 V, or voltage dropping too low while cranking | Measure the Red to ground with the key on: you should see about 12 V. While cranking it must stay above 10 V. If it doesn't, move the Red to another switched 12 V source and charge the battery. |
| No spark at all, even with good power | Both trigger circuits connected, or the wrong one used for your distributor | Use either the White or the Violet · Green connector, never both. Do the spark test for the circuit you are using: tap the White to ground, or short Violet to Green and break the short. |
| Engine runs rough or timing is erratic with a magnetic pickup | Pickup polarity reversed or wires picking up interference | Violet must go to pickup +, Green to pickup −. Check your distributor's pickup colors. Twist the pair and route it away from plug wires and power leads. |
| Coil or MSD stopped working after start-up | An original vehicle wire was left on a coil terminal | Disconnect everything except the MSD Orange on coil + and the MSD Black on coil −. Move the original wires to the MSD Red and White as your variant shows. Then repeat the spark test with a known good coil. |
| Weak spark, misfires or high-rpm miss | Poor ground, power leads not taken directly from the battery, or a discharged battery | Clean and tighten the Heavy black at the battery − terminal or bare engine metal. Make sure the Heavy red does not go to the alternator. Fit an engine-to-chassis ground strap. Keep the battery above 10 V. |
| Engine keeps running after the key is turned off | Voltage leaking from the charging light circuit into the small Red wire | Install the supplied diode in the charging indicator wire, in the correct direction. On early Ford this goes on terminal 1, on early GM terminal 4, and on a Delcotron alternator the smallest wire. On other vehicles, put a resistor in line with the Red. |
| Rev limiter cuts in at the wrong rpm on a 4 or 6-cylinder | Cylinder select not modified, or wrong RPM module | Remove the round side cover and check that the correct loop was cut for your cylinder count. Check the rating printed on the module plugged into the socket. |
| Tachometer reads zero or jumps around | Tach still triggered from coil −, or needs an adapter | Move the tach trigger wire to the Tach output terminal. If it still doesn't read, use the PN 8910 adapter with a White trigger or the PN 8920 with a magnetic trigger. On GM, bypass the inline tach filter. |
| Fuel-injected import cranks but won't run | The injection system can't read the trigger signal shared with the MSD | Add a Tach/Fuel Injection Adapter, PN 8910. If that doesn't fix it, use the PN 8910-EIS, which Toyota and Ford Probe always need. |
| GM 5-pin HEI hesitates or stalls on deceleration | Known issue with some 5-pin modules | Check that the White and Red jumpers go to the brown and pink terminals as shown. If the stall continues, ask MSD technical support for the bolt-in diode made for this problem. |
| Intermittent miss that comes and goes | Loose or corroded splices, or plug wires arcing | Check every splice for a soldered, sealed joint. Check the plug wires at the cap and the plugs for a tight fit, cuts or burns. Fit a new cap and rotor. |