Audiopipe TXX-BD2-12 Subwoofer Wiring Diagram

Wiring options
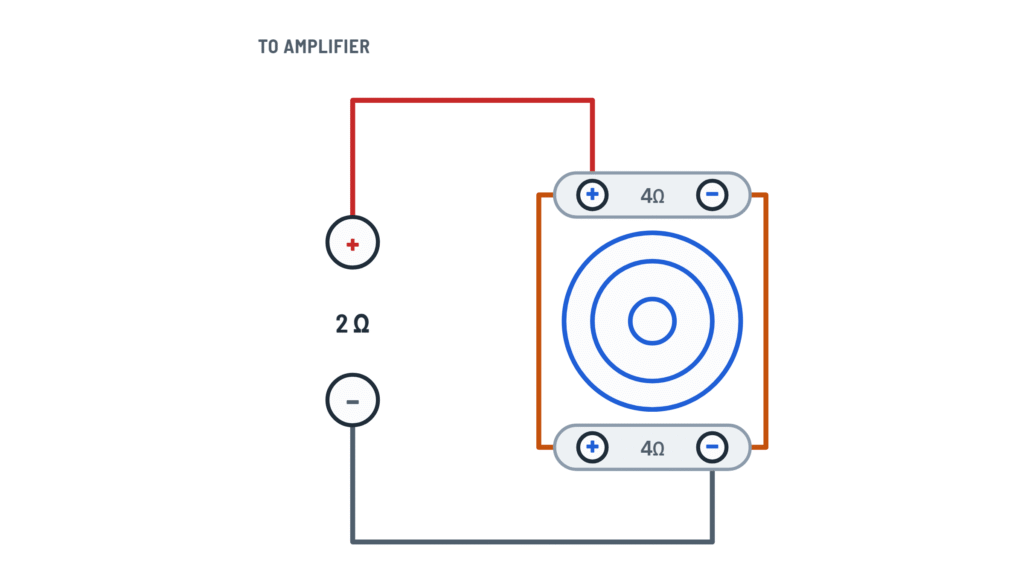
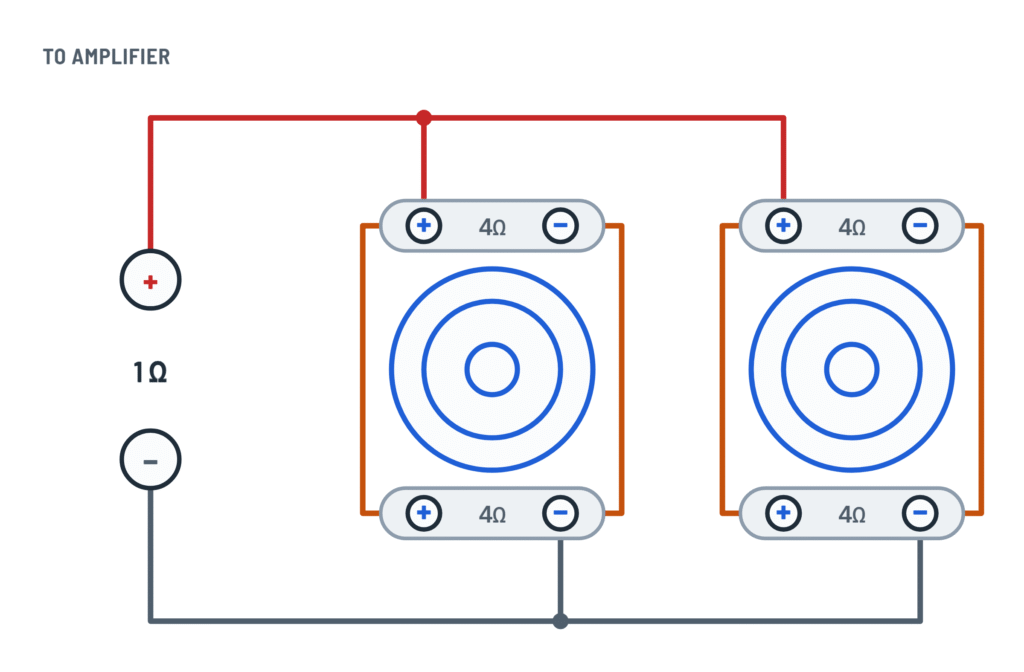
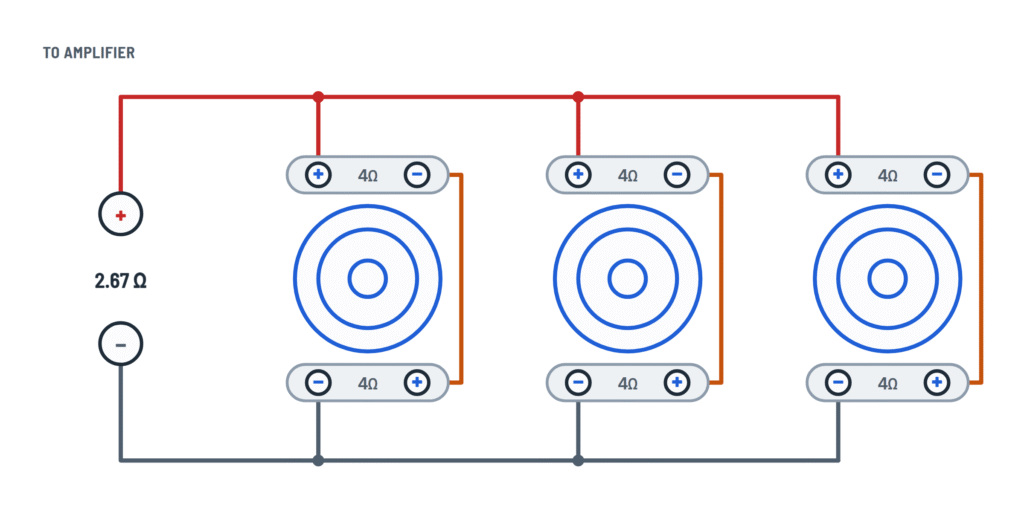
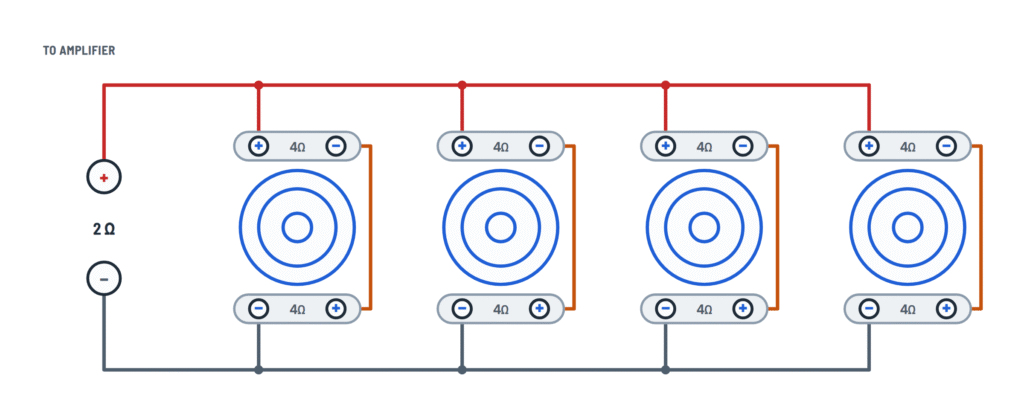
One to four dual 4 Ω voice coil subwoofers and the load the amplifier sees in each case.
Terminals and components · 4
- Positive
- Negative
- Voice coil jumpers
- Subwoofer
Load by wiring
Load Subwoofers Voice coils 2 Ω 1 Parallel 8 Ω 1 Series 1 Ω 2 Parallel 4 Ω 2 Series 2.67 Ω 3 Series 2 Ω 4 Series Both voice coils
Both voice coils must be connected to the amplifier: never leave one disconnected.
Parallel
Join the + of one voice coil to the + of the other, and − to −: each subwoofer becomes 2 Ω.
Series
Join the − of the upper voice coil to the + of the lower one: each subwoofer becomes 8 Ω.
About This Diagram
This diagram is redrawn from page 5 of the Audiopipe TXX-BD2-12 Subwoofer manual, and we offer it completely free and in English. We have also categorized it in the Car Audio & Stereo (Automotive) section on Diagramverse, and it has been rated by 1 user with an average rating of 5.0. If you have any specific questions about the Audiopipe TXX-BD2-12 Subwoofer Wiring Diagram, we suggest checking the Frequently Asked Questions (FAQs) section.
Printable Audiopipe TXX-BD2-12 Wiring Diagrams




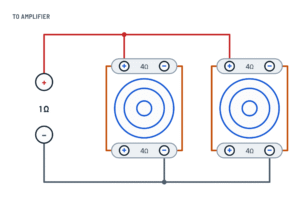
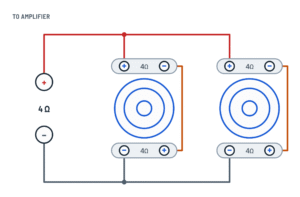
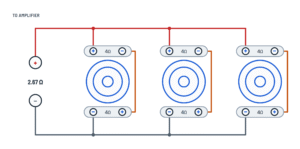

Wiring Instructions
Before you start
First, pick the variant that matches your Audiopipe TXX-BD2-12 system. Count your subwoofers, then find the minimum load (Ω) your amplifier is rated for. Choose the variant whose final load your amplifier can drive:
- One subwoofer: use 1 sub · 2 Ω or 1 sub · 8 Ω.
- Two subwoofers: use 2 subs · 1 Ω or 2 subs · 4 Ω.
- Three subwoofers: use 3 subs · 2.67 Ω.
- Four subwoofers: use 4 subs · 2 Ω.
Your amplifier can't tell how many subwoofers are connected. It only sees the final impedance, so that's the number to match.
Tools and materials: wire strippers, a crimper if you use crimp terminals, a tool that fits the subwoofer terminals, a multimeter with a resistance range, stranded copper speaker wire, and short pieces of the same wire for the voice coil jumpers. The sources don't give a wire gauge. As a general rule, use heavy speaker wire for a high-power subwoofer, and check what gauge your amplifier's speaker terminals accept.
Isolation: turn off the audio system and the ignition before you handle any speaker wire. If you're also installing or changing the amplifier's power cable, disconnect the vehicle battery negative first. Fit that cable with the fuse your amplifier's documentation specifies, close to the battery. Speaker-level wiring like this doesn't normally need a permit. If you're not confident running high-current power cable through a vehicle, have a professional installer do that part.
Step-by-step wiring
- Mount each TXX-BD2-12 in its enclosure. Leave enough slack in the leads to reach the terminals. Identify the upper voice coil (coil 1) and the lower voice coil (coil 2) on each subwoofer. The red-marked terminal of each coil is + and the black one is −.
- Before adding any jumpers, measure each voice coil with the multimeter. Each coil should read roughly 3.6 Ω. That's normal for a 4 Ω coil and confirms neither coil is open or shorted.
- Fit the Voice coil jumpers on each subwoofer for your variant. For 1 sub · 2 Ω and 2 subs · 1 Ω (parallel): join + to + and − to −. For 1 sub · 8 Ω, 2 subs · 4 Ω, 3 subs · 2.67 Ω and 4 subs · 2 Ω (series): join coil 1 − to coil 2 + only.
- Measure each subwoofer between coil 1 + and coil 2 −. A parallel subwoofer should read about 1.8 Ω, and a series subwoofer about 7.2 Ω. A reading of about 3.6 Ω usually means a jumper is missing.
- Run the leads from Amplifier positive (+) to the + of the upper voice coil (coil 1) of every subwoofer.
- Run the leads from Amplifier negative (−) to the − of the lower voice coil (coil 2) of every subwoofer. With several subwoofers, keep the lead lengths similar and the polarity identical on every unit.
- Before you connect anything to the amplifier, measure across the free ends of the + and − leads. Expected readings are roughly:
- 1 sub · 2 Ω: about 1.8 Ω.
- 1 sub · 8 Ω: about 7.2 Ω.
- 2 subs · 1 Ω: about 0.9 Ω.
- 2 subs · 4 Ω: about 3.6 Ω.
- 3 subs · 2.67 Ω: about 2.4 Ω.
- 4 subs · 2 Ω: about 1.8 Ω.
- Connect the leads to the amplifier's speaker outputs and tighten every terminal. Make sure no stray strands bridge + and −. Secure the wires so they can't rub on metal edges or get pinched by the enclosure or seats.
Testing and start-up
Set the amplifier gain to minimum and set its low-pass filter for subwoofer use. Reconnect the battery if you disconnected it, then turn the system on. Play bass at low volume and check three things:
- Every subwoofer is playing.
- The amplifier stays out of protect mode.
- Nothing rattles.
With several subwoofers, all cones should move in the same direction. A common check is to briefly touch a 1.5 V battery across the speaker leads with the amplifier disconnected.
Raise the gain gradually until the bass is loud but still clean. The TXX-BD2-12 is rated 750/1500 W. Match it to the amplifier's continuous (RMS) output, and don't drive the amplifier hard into distortion. After a few minutes of normal use, the amplifier should feel warm, not hot.
Safety notes
- Always connect both voice coils. Never run a TXX-BD2-12 on one coil only.
- Never wire a load below your amplifier's rated minimum. The 1 Ω variant is only for amplifiers rated to drive 1 Ω.
- A high-power amplifier puts out enough voltage to give you a sting. Don't touch the speaker terminals or leads while music is playing.
- A short between the + and − speaker leads can damage the amplifier. Insulate all joints and check them with the meter before power-up.
- The fuse on the amplifier's power cable protects the vehicle wiring from fire. Never leave it out and never oversize it.
- A loaded subwoofer enclosure is heavy. Secure it so it can't shift under braking or in a collision.
Troubleshooting
| Symptom | Probable Cause | What to Check |
|---|---|---|
| The amplifier goes into protect mode as soon as I turn it on | The final load is below the amplifier's rating, or stray strands are shorting + to − | Disconnect the leads at the amplifier and measure across them. Compare with the expected value for your variant, for example about 0.9 Ω for 2 subs · 1 Ω. A reading near 0 Ω means a short. Inspect every terminal and jumper. |
| With two or more subs, the bass is weak and thin even at high volume | One subwoofer is wired with reversed polarity, so the subs cancel each other | Check that Amplifier positive (+) goes to coil 1 + (red) on every sub and Amplifier negative (−) to coil 2 − (black). Do a brief 1.5 V battery check: all cones must move the same way. |
| A single sub in the 2 Ω setup reads about 3.6 Ω instead of 1.8 Ω | One parallel jumper is missing, so only one voice coil is connected | Fit both Voice coil jumpers: + to + and − to −. Measure again between coil 1 + and coil 2 −. It should read about 1.8 Ω. |
| The meter shows an open circuit (no reading) across a series-wired sub | The coil 1 − to coil 2 + jumper is missing or loose | Fit or tighten the series jumper. Measure between coil 1 + and coil 2 −. It should read about 7.2 Ω. |
| The meter reads close to 0 Ω across a sub | A jumper is on the wrong terminals, for example from coil 1 + to coil 1 −, which shorts the coil | Remove the jumpers and measure each coil alone. Each should read about 3.6 Ω. Refit the jumpers exactly as your variant shows. |
| The sub sounds much quieter than I expected in the 8 Ω or 4 Ω setup | Most amplifiers deliver much less power into a higher impedance | Check your amplifier's output rating at that load. If it's rated for a lower load, use the matching variant, for example 1 sub · 2 Ω instead of 1 sub · 8 Ω. |
| The amplifier gets very hot and shuts down after a while | The load is too low for the amplifier, the gain is set too high, or the speaker wire is undersized | Confirm the measured load is within the amplifier's rating. Lower the gain. Check that the speaker wire is heavy enough for the power and run length. |
| One of several subs is silent | A broken lead or a loose terminal on that sub | With the amplifier off, measure that sub on its own between coil 1 + and coil 2 −. Then check the lead for continuity back to the amplifier. |
| The bass cuts in and out over bumps | A loose terminal or a jumper working free | Tug-test every connection at the subs and the amplifier. Retighten or re-crimp, and secure the wiring so it can't move. |
| The sub distorts or makes harsh noises at high volume | The amplifier is clipping because the gain is too high, or it's pushing well past the sub's continuous rating | Turn the gain down until the bass is clean. Make sure the amplifier's RMS output at your final load suits the 750/1500 W rating. |