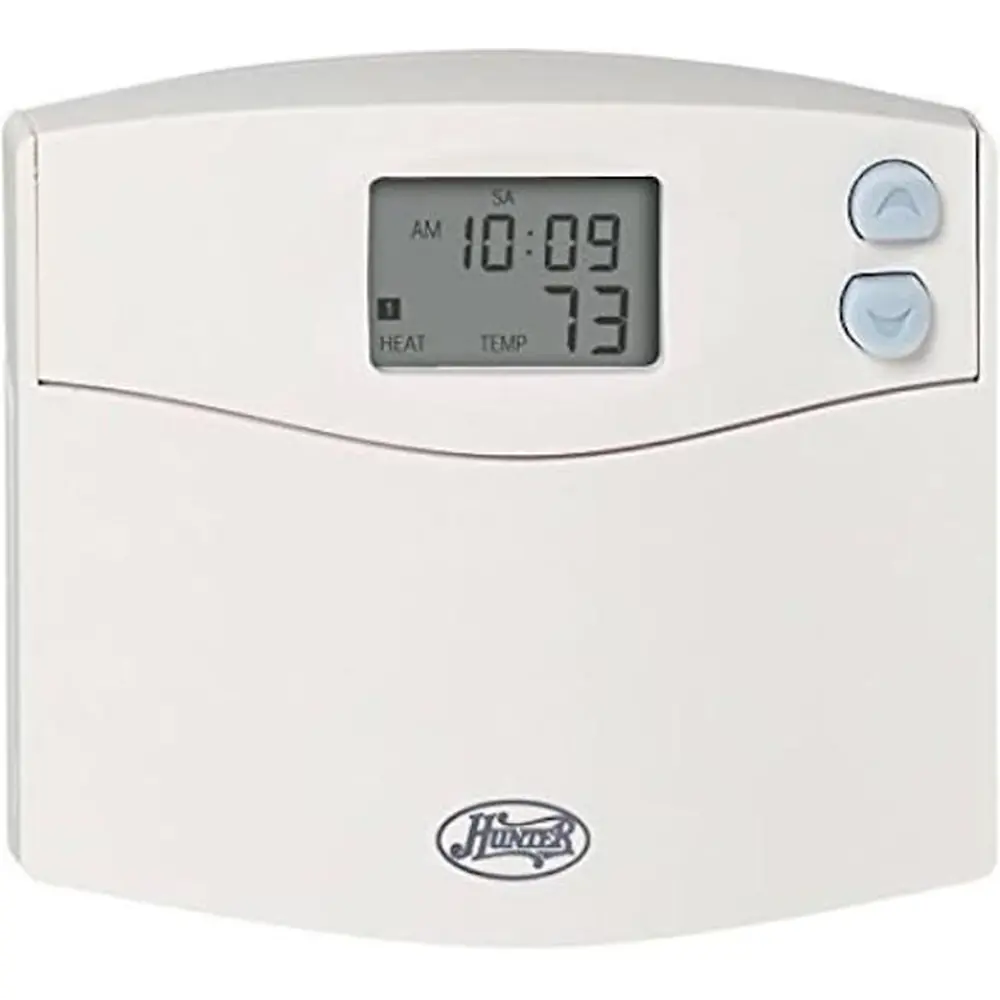
Hunter 44110 Thermostat Wiring Diagram
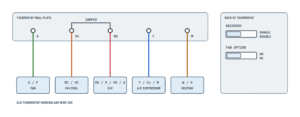
Wall plate and switches
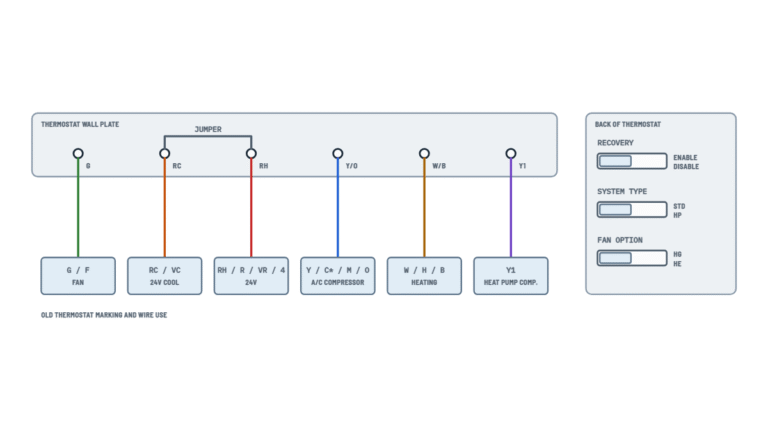
Which terminal each wire goes to by the old thermostat's letter, the RC-RH jumper and the switches on the back.
Terminals and components · 8
- RH
- RC
- Y
- W
- G
- Jumper and switches
2-wire heat only
If the wires are unmarked, one goes to RH and the other to W.
With two transformers
If you leave the jumper with both RH and RC connected, you tie the two transformers together and can damage the equipment.
C wire
If there are both Y and C wires, C may be the common: do not connect it to any terminal (this thermostat runs on batteries).
With an electric furnace
Leave it on HG and test: if the fan does not come on within a minute of a call for heat, move the switch to HE.
Conventional systems
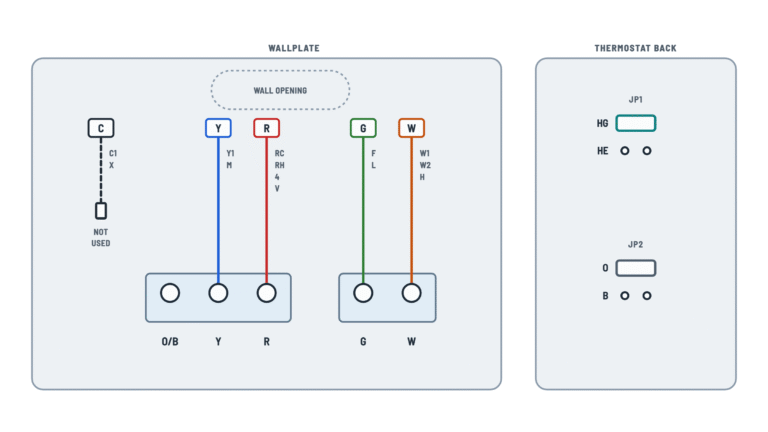
Furnace or boiler with air conditioning, cool only or heat only: which wires there are and where each one goes.
Terminals and components · 5
- RH
- RC
- Y
- W
- G
- Jumper
2-wire heat only
If the wires are unmarked, one goes to RH and the other to W.
With two transformers
If you leave the jumper with both RH and RC connected, you tie the two transformers together and can damage the equipment.
C wire
If there are both Y and C wires, C may be the common: do not connect it to any terminal (this thermostat runs on batteries).
About This Diagram
These diagrams are redrawn from pages 10 and 16–19 of the Hunter 44110 Thermostat manual, and we offer them completely free and in English. We have also categorized it in the Thermostats (HVAC & Water Heating) section on Diagramverse, and it has been rated by 1 user with an average rating of 5.0. If you have any specific questions about the Hunter 44110 Thermostat Wiring Diagram, we suggest checking the Frequently Asked Questions (FAQs) section.
Printable Hunter 44110 Wiring Diagrams


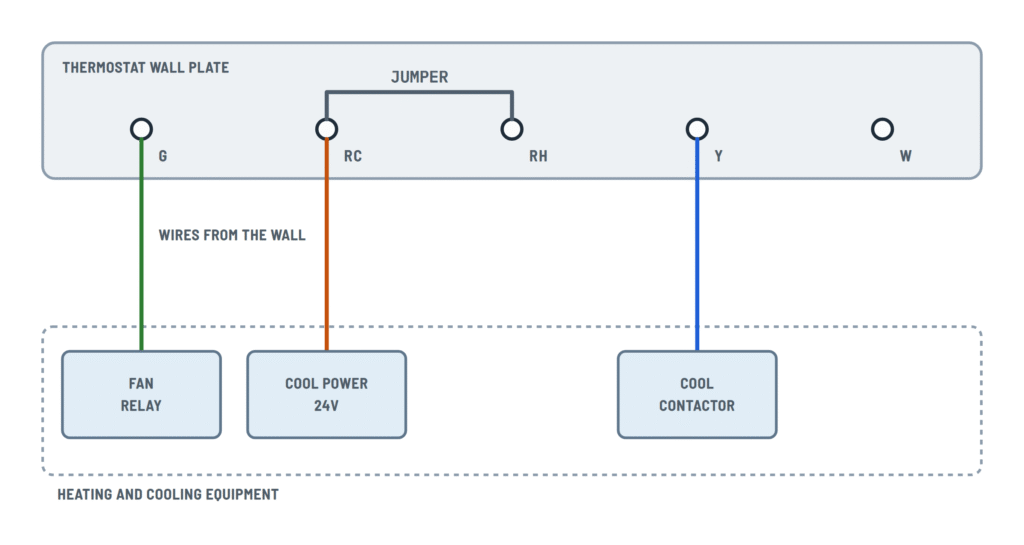
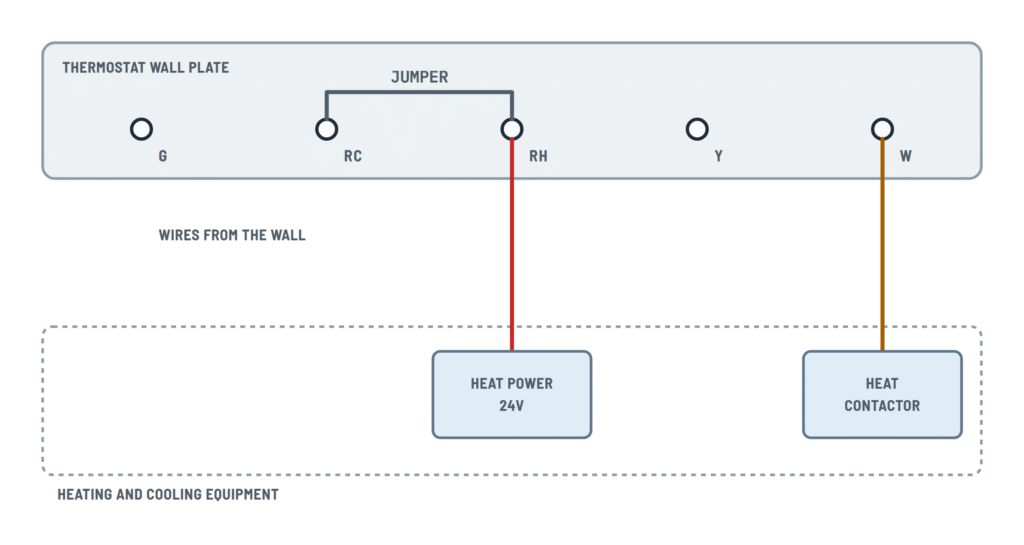
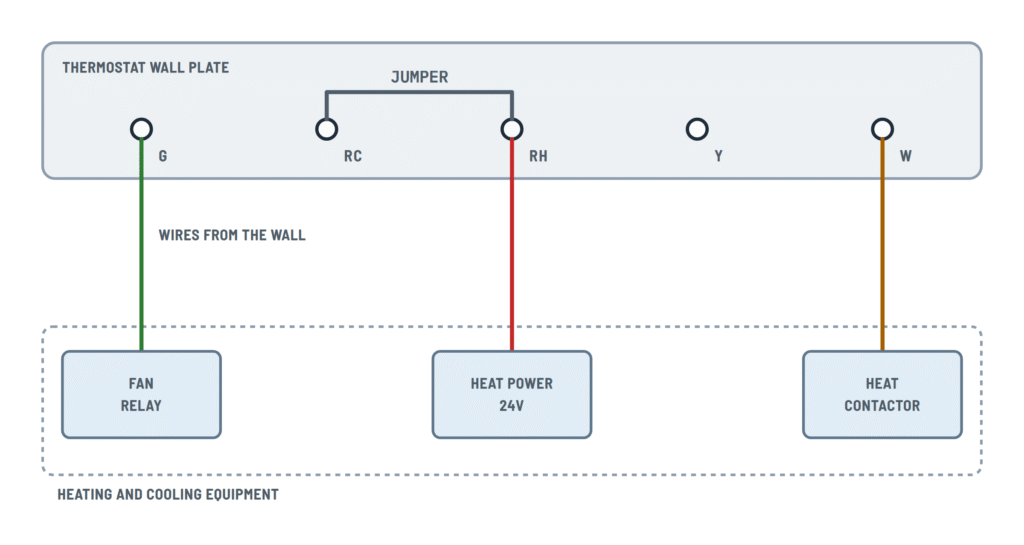

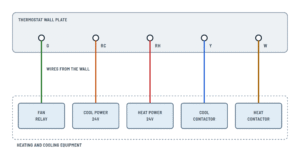
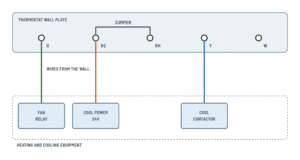

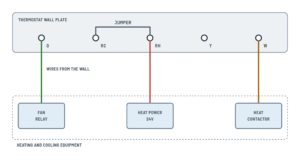
Wiring Instructions
Before you start
The Hunter 44110 is a battery-powered thermostat for 24V AC heating and cooling systems and for millivolt gas heating. It works with gas furnaces (standing pilot or electronic ignition), gas and oil boilers, oil furnaces, electric furnaces and central air conditioning. It does not work with heat pumps or with 110/220 V electric baseboard heat. If you are not sure what system you have, ask an HVAC technician before you wire it.
You need a flat-head screwdriver, a small Phillips screwdriver, a hammer and a drill with a 3/16" bit. You also need the supplied screws, anchors and wire labels, some electrical tape and two new AA alkaline batteries. A replacement thermostat normally reuses the existing cable. If you run new cable, standard thermostat wire is typical, and 18 AWG is common practice. Check your local code. Swapping a low-voltage thermostat is usually a homeowner job. Leave new cable runs and any work inside the furnace or air handler to a qualified technician, and check whether your area requires a permit.
Count your wires to choose the tab, leaving out any C wire:
- One R wire plus Y, W and G is 4-wire.
- Separate RH and RC wires plus Y, W and G is 5-wire.
- R, Y and G with no W is Cool only.
- Two wires is Heat, 2-wire.
- R, W and G is Heat, 3-wire.
The Complete tab shows every terminal and the two switches on the back of the thermostat.
Step-by-step wiring
- Set the old thermostat to OFF. Then turn off power to the HVAC system at the main panel or at the furnace.
- Remove the old cover and body until you can see the wires. Do not disconnect anything yet.
- Label each wire by the letter of the terminal it is on: G or F gets G, W or H gets W, Y or M gets Y, RC or VC gets RC, and RH, R, VR or 4 gets RH. Ignore the insulation colors. If the terminals are unmarked and you have more than two wires, call a technician.
- If you have both a Y and a C wire, C is a common wire that this thermostat does not use. Tape its bare end and push it back into the wall.
- Secure the cable so it cannot slip into the wall. Disconnect the wires and remove the old wall plate.
- Press the tab on the bottom of the new thermostat to release its wall plate. Pull the wires through the plate's opening and level the plate. Mark and drill two holes, tap in the anchors and screw the plate firmly to the wall.
- Set the RC – RH jumper. Leave it in place if you have a single R wire, and remove it if you have both RH and RC wires.
- Loosen the terminal screws without removing them. Insert each wire behind the black terminal shield of the terminal its label names, and tighten each screw. On an unmarked two-wire heat-only system, one wire goes to RH and the other to W.
- Tape the ends of any unused wires and push the extra cable back into the wall.
- On the back of the thermostat, set HG / HE to HG for gas furnaces and oil burners, or to HE for electric furnaces. Set RECOVERY to ENABLE or DISABLE, as you prefer.
- Set the SYSTEM switch to OFF and FAN to AUTO. Hook the top of the thermostat over the two wall plate tabs and press the bottom until it snaps in. Never force it, because the terminal pins can bend.
- Insert the batteries and restore power at the panel or furnace.
Testing and start-up
Set the day and time, then test one function at a time:
- Heat: Select HEAT and raise the setpoint above room temperature. Heating should start. A gas or oil furnace starts its own blower after it warms up. On an electric furnace, if the fan does not start within about a minute of the call for heat, move the switch to HE.
- Cool: Select COOL and lower the setpoint below room temperature. The compressor and fan should start. Allow up to about 4 minutes, because there is a 3.5-minute compressor protection delay after every cooling shutdown.
- Fan: Slide FAN to ON, and the blower should run continuously. Return it to AUTO.
- Off: With SYSTEM at OFF, nothing should run.
If something fails, turn the power off before you remove the thermostat to check the connections.
Safety notes
- This thermostat only switches low-voltage control circuits. Never connect it to 120/240V wiring or to baseboard heaters. If the old thermostat has heavy wires joined with wire nuts, it runs on line voltage. Stop and call an electrician.
- Keep the power off while you work. Touching the R wire to another wire while it is powered can blow the fuse on the furnace control board or damage the transformer.
- Furnaces and air handlers contain line voltage. Do not open them unless you are qualified, and keep the blower door properly closed.
- Set SYSTEM to OFF whenever you remove or refit the thermostat, so the equipment does not switch rapidly on and off.
- When the batteries are fully drained, the thermostat turns the system off. Replace them every year and before any absence longer than 30 days, especially in freezing weather.
Troubleshooting
| Symptom | Probable Cause | What to Check |
|---|---|---|
| The display works but neither heat nor cooling comes on | The RC – RH jumper was removed on a system with a single R wire, or the R wire is on the wrong terminal | With one R wire, the wire must be on its labeled terminal and the jumper must join RC and RH. Put the jumper back and tighten both screws. |
| Heat works but the air conditioning never starts | On a 5-wire system the RC wire is loose or missing. On a 4-wire system the jumper is missing. Or the Y wire is loose. | Turn the power off and check that RC and Y are under their screws behind the terminal shields. Check the A/C breaker or disconnect, and wait up to 4 minutes for the compressor delay. |
| Asking for heat turns on the air conditioner, or the other way around | W and Y were swapped because the wires were identified by color | Check the old thermostat's terminal letters. The wire from W or H goes to W, and the wire from Y or M goes to Y. Reconnect them that way. |
| On an electric furnace the heat comes on but the blower does not | The HG / HE switch is still at HG | Set SYSTEM to OFF and remove the thermostat. Slide the switch to HE and test again. The fan should start within about a minute of the call for heat. |
| With a gas or oil furnace the blower starts at once and blows cold air before the heat arrives | The HG / HE switch is set to HE | Set the switch to HG so the furnace runs its own blower after it warms up. |
| The furnace went completely dead after wiring, but the thermostat display is still on | A fuse on the furnace control board blew because R touched another wire with the power on, or because a C wire was connected to RH or RC | Make sure the C wire is taped and not connected to any terminal. Have the control board fuse checked and replaced with one of the same rating. Also check the breaker, the furnace switch and the blower door. |
| The equipment keeps running even with the thermostat set to OFF | Bare wire ends or stray strands are touching each other at the wall plate, for example R touching W or Y | Turn the power off. Re-strip and reconnect the wires so no copper shows outside the terminals and no strands bridge two terminals. If the wiring is clean and it still runs, the thermostat is faulty and must be replaced. |
| Heat works only some of the time, or not at all, on a standing pilot or millivolt system | A loose connection on RH or W. Millivolt circuits tolerate almost no resistance. | Tighten the RH and W screws onto clean, bright copper. Check that the thermostat is fully snapped onto the wall plate pins. |
| The screen is blank or only the battery symbol flashes, and the system is off | The batteries are dead, weak or inserted wrong. The thermostat draws no power from the wires. | Install two new AA alkaline batteries the right way round. If needed, press RESET with a paper clip, then reprogram. |
| The display flashes Err and the system shuts off | The thermostat has detected a battery problem | Replace both batteries with new alkaline cells, even if you changed them recently. Press RESET and reprogram. If Err comes back or never clears, the thermostat needs replacing. |